Map Maker 5 course
Installation of the software
How to download & install the software and course data
We will use the free GIS/map making software called Map Maker 5 (MM5) which can be downloaded from here:
www.mapmaker.com click on the download tab.
It is the full version, after 30 days it will revert to the GRATIS version and some features we have used in this map production will not work anymore. It is designed for Windows 10 and now 11 but will also run on Windows 7
The installation works like any other. In short: keep clicking on the presented menus and buttons, accept terms & conditions etc. and all will be installed properly.
Here is the step by step run:
- On their download page: Click on the link ‘Download Map Maker 5’
- In your Download folder you will then find a file called: Install Map Maker 5.exe
- double click on it.
- A blue ‘Windows protect your PC’ menu will open, click on More info
- Click on Run anyway
- Yellow Windows user account control menu opens asking your approval to install it: YES
- A ‘Welcome to Map Maker 5 setup’ menu opens: click Next
- Choose install location (leave as is): Next
- Choose start menu folder (leave as is): Install
- Completing the installation: Finish
Map Maker 5 will now have fired up.
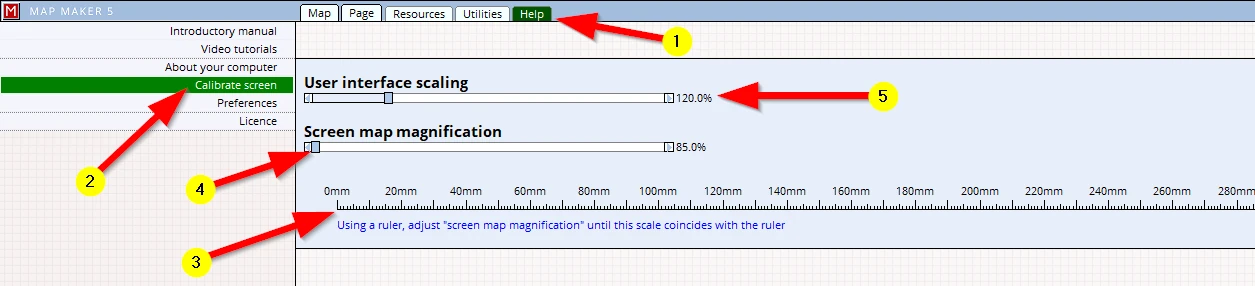
It is advisable to first ‘calibrate’ your screen. This ensures that all the maps on screen are (more or less) true to scale (which means you can hold a ruler against your screen and measure sensible distances off your screen).
To do so, click, on the tabs:
(1) Help
(2) Calibrate screen
(3) Put a ruler against the screen, and line up 0 against 0 then ...
Alternatively, hold an A4 sheet of paper against the ruler (longest side = 297 mm shortest side = 210 mm) and use that to adjust the screen scale.
(4) use the Screen map magnification slider to adjust the screen ruler so that the numbers line up with those on your ruler. It is easiest to look at the largest distance possible. For a tiny nudge use the little arrows on either side, or click on the % reading and type in a desired number.
Also:
(5) It could be you feel that on your screen the menu and buttons are a bit too small or too large. This can be changed by adjusting the ‘User interface scaling’ slider.
Close MM5 down and fire it up again to activate it.
A tip for International users: map projections.
All digital maps work within a standard mathematical 2D - X & Y coordinate system. Every country relates this standard grid to the earth’s 3D - Longitude and Latitude coordinate system. This relationship is defined in a so-called ‘map projection’. It is beyond the scope of this course to explain any of this.
The course material is situated in the UK, and the default map projection for this software is set to the UK national grid. Setting up a specific map projection is not necessary provided no interaction is made with Longitude and Latitude coordinates (like for example importing GPS data). For those slightly more advanced and who do know about these matters and at this stage already want to set up a specific national map projection, please refer to Appendix 5.
Installation of the course map materials
Download the map materials from here:
https://downloads.latitudecartography.co.uk/MM_Course.zip
Right-mouse click on the zip file,
a choice menu will open up, please select: 'Extract All'
and type in: C:\ (or direct the 'Browse' button and select: 'Local Disk C:\')
Extract.
Done.
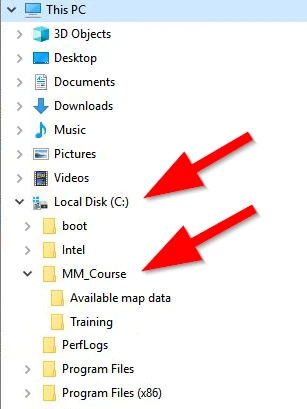
A folder will appear in your Windows File Explorer called ‘MM_Course’.
If you want you can move the folder to any other location, as long as you remember where to find it. But during this course we will assume it is placed directly under 'Local Disk C:\’
In this main folder (MM_Course) one can find two sub-folders. All the map data we will use can be found in the folder called: ‘Available map data’.
In this folder you can find a PDF called ‘MY FIRST MAP_A3L_150dpi.pdf’ which is the produced map.
In it you can also find a PDF which has the url hyper links to web-sites mentioned in this course.
We suggest you can save all your work in the ‘Training’ folder.
Once you are confident and up and running with map making you can delete the entire folder structure (or keep it for future reference!).
We are now ready to make our first map!